

使用travis自动部署jekyll博客到服务器或者github-pages
部署到服务器
简述
- 授权
travis读写和监测仓库的权限 - 本地到push代码到远程触发
travis travis通过ssh登录服务器自动同步代码编译新的静态网页代码nginx实现部署
自动化部署私有仓库到服务器或者源仓库就在服务器可使用githooks –> githooks自动化部署
环境准备
这步主要是设置服务器的环境和travis对github的授权获取
服务器
服务器使用阿里云或者腾讯云都可以,配置基本可以走最低配置,大多数时候只跑一个nginx而已.系统选择ubuntu或者centos.下面以ubuntu18.04的阿里云为例
登录服务器以后先更新系统
1
2
root# apt update
root# apt upgrade
为了避免安全风险,应该先建立一个带有sudo权限的普通用户部署博客.按照linux新建用户里面的方法新建. 之后所有操作切换到普通用户进行.
git
服务器上需要安装git工具
1
$ sudo apt install git
克隆你的blog到服务器
1
2
$ cd ${workspace}
$ git clone git@github.com:/${user}/&{your-blog}.git
github上的该仓库需要设置成开源,travis对私有项目部署是收费的
ruby
在服务器上安装ruby环境请参考Ruby安装使用
安装完以后需要安装三个ruby包
1
$ gem install jekyll bundler travis
其他的包后续使用bundle install可以自动完成
nginx
ngix在服务器上的安装与设置请参考Nginx安装配置
配置好环境以后,root的路径先不用配置
ssh
ssh在服务器上的安装请参照ssh安装使用
然后生成一对秘钥待使用
travis
首先要使用github登录travis.打开setting
然后同步账号的仓库信息

接着打开你要自动部署的仓库

实现自动部署
切换到你的blog路径
1
$ cd ${workspace}/${your-blog}
基本自动部署脚本
新建.travls.yml
1
$ vim .travis.yml
1
2
3
4
5
6
7
8
9
language: ruby
rvm:
- 2.7.0
branches:
  only:
  - master
install:
- bundle install
script: jekyll build
tarvis login
1
2
3
4
5
6
7
8
9
$ travis login
We need your GitHub login to identify you.
This information will not be sent to Travis CI, only to api.github.com.
The password will not be displayed.

Try running with --github-token or --auto if you don't want to enter your password anyway.

Username: ${your/github/user}
password: {your/github/password}
出现success就是登录成功
生成保密key
1
$ travis encrypt-file ~/.ssh/id_rsa --add
按照提示操作,就会生成id_rsa.enc文件,同时在.travis文件里会生成
1
2
3
before_install:
- openssl aes-256-cbc -K $encrypted_ebb8fbb5669e_key -iv $encrypted_ebb8fbb5669e_iv
  -in id_rsa.enc -out ~/.ssh/id_rsa -d
设置自动部署脚本
travis检测到新提交并成功isntall以后,登录服务器,进行我们自动部署的步骤
这里我在根目录新建.travis目录,把travis相关文件放置到这个文件夹下
1
$ mv id_rsa.enc .travis
修改.travis.yml文件
1
2
3
4
before_install:
- openssl aes-256-cbc -K $encrypted_ebb8fbb5669e_key -iv $encrypted_ebb8fbb5669e_iv
  -in id_rsa.enc -out ~/.ssh/id_rsa -d
修改为
1
2
3
4
before_install:
- openssl aes-256-cbc -K $encrypted_ebb8fbb5669e_key -iv $encrypted_ebb8fbb5669e_iv
  -in .travis/id_rsa.enc -out ~/.ssh/id_rsa -d
在文件最后新增after_success:
1
2
3
atfer_success:
- chmod 600 ~/.ssh/id_rsa
- ssh {user}@xx.x.xx.x -o StrictHostKeyChecking=no 'cd ~/blog/Avalon && bash .travis/deploy.sh && exit'
在.travis文件加下新建deploy.sh脚本
1
2

$ vim .travis/deploy.sh
内容如下
1
2
3
4
5
6
7
8
9
10
11
12
13
14
set -euxo pipefail

echo -e "\033[32m $(git version) \033[0m"

git config user.name ${user}
git config user.email ${email}

cd ${workspace}/{your-blog}

git pull origin master
~/.rvm/gems/ruby-2.7.0/wrappers/bundle install
~/.rvm/gems/ruby-2.7.0/wrappers/jekyll build

exit 0
nginx部署
在nginx配置文件中将目录指向编译生成的_site
1
2
3
4
5
location / {
                        root ${workspace}/${your-blog}/_site;
                        index index.html index.htm;
                }
自此,整个自动部署流程就结束了,之后每次push代码,travis都会自动检测并登录服务器进行更新
部署到github pages
简述
- 授权
travis读写和监测仓库的权限 - 本地到push代码到远程触发
travis travis编译完以后push到仓库的’gh-pages’分支- githubio完成部署
准备环境
主要完成本地PC环境的部署和github对travis的授权
ssh
在本地安装ssh,将生成的公钥放上个github。请参照ssh安装使用
ruby
在本地环境中安装ruby环境请参考Ruby安装使用
安装完需要在本地环境中安装3个ruby包
1
$ gem install jekyll bundler travis
git
Repositories设置
首先要在github上把项目设置成public,travis只对开源项目免费,然后将项目clone到本地
note : 这里一定要使用ssh的方式clone下来,不能使用https.
1
2
$ cd ${workspace}
$ git clone git@github.com:${user}/{your-blog}.git
之后需要新建gh-pages分支,同时推送到远端
1
2
$ git branch gh-pages
$ git push origin pg-pages
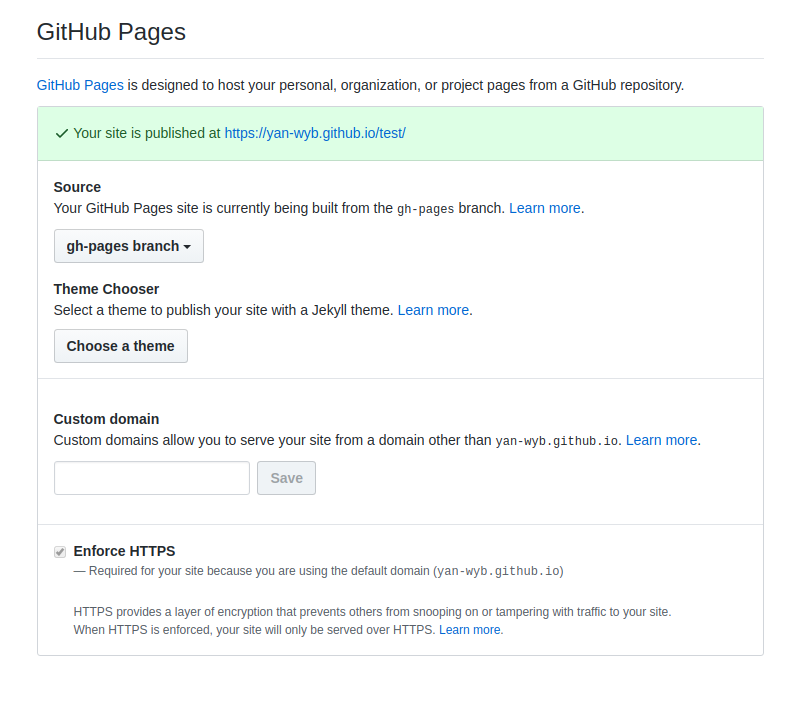
打开github pages
打开仓库的setting

在列表中找到github pages,设置成gh-pages分支
travis
首先要使用github登录travis.打开setting
然后同步账号的仓库信息
接着打开你要自动部署的仓库
实现自动部署
与部署到服务器不同,部署到github pages我们借用了rake实现自动部署
github生成新的token
在使用github登陆travis时实际上已经生成了一个token,但是这个token没有写repo的权限,因此需要生成新的token
- 打开
github的setting --> Development Settings.
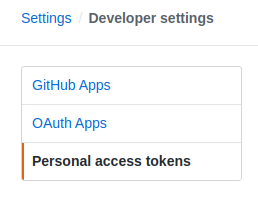
- 点击左边最底下的
Personal access token,在右上角就会看到Generate new token.

- 为即将生成的新
token设置note,相当于标识,或者别名

- 设置
token的权限
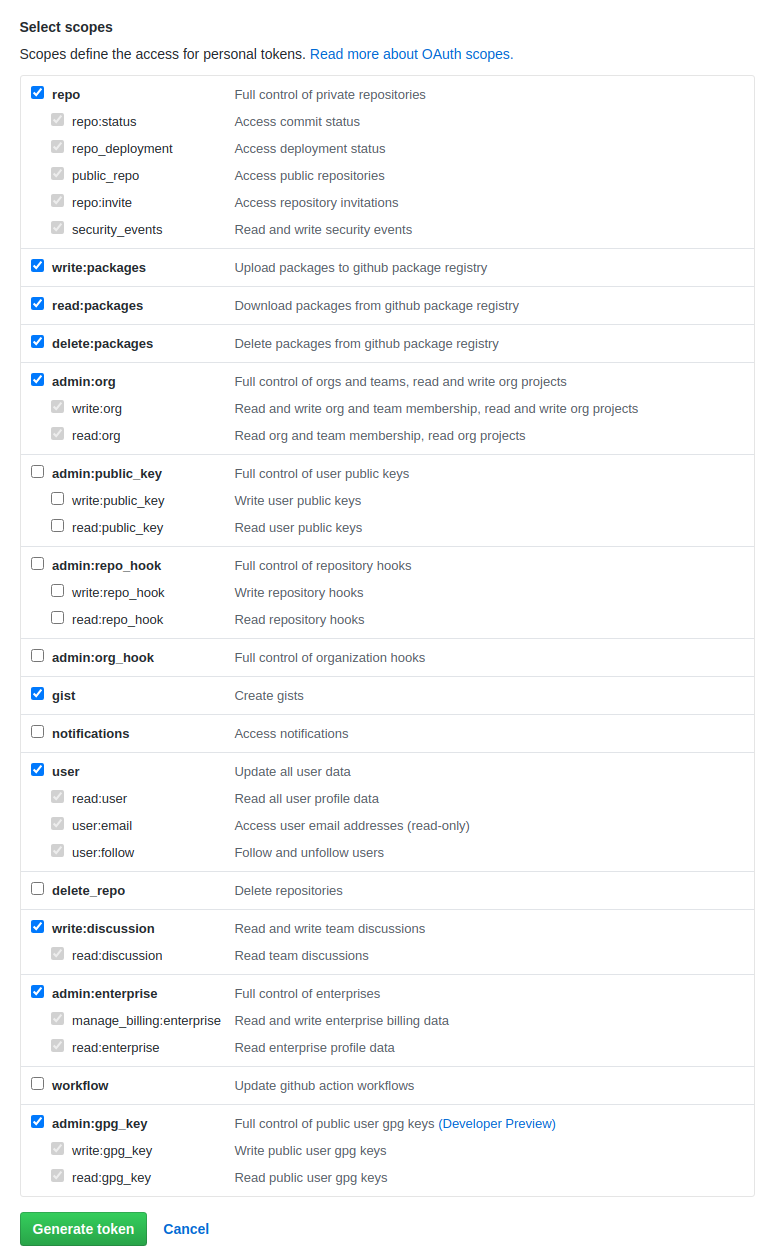
5.记下token的值,这个值只有第一次生成时会显示,之后就不会再显示了,因此生成时一定要复制下来

token生成密钥
使用git账号登录travis
1
2
3
4
5
6
7
8
9
$ travis login
We need your GitHub login to identify you.
This information will not be sent to Travis CI, only to api.github.com.
The password will not be displayed.

Try running with --github-token or --auto if you don't want to enter your password anyway.

Username: ${your/github/user}
password: {your/github/password}
利用travis的ruby包可以生成包含token的密钥
1
2
3
4
5
6
7
8
9
10
$ travis encrypt 'GIT_NAME="${user}" GIT_EMAIL="${email}" GH_TOKEN=${token}'

Detected repository as ${user}/${your-blog}, is this correct? |yes| yes
Please add the following to your .travis.yml file:

  secure: "N/5TqXrxjS0J6yKvRlzXnuYtfRPFYeK/O2oumIMuCWTK9U9v54pBTyOhiuCvoS5zJkxa4hdQwXs+wdIBDimILPu1JqQEhtjqLC2toK3vMNgf76KE6G+FtBzpEOrjA8vsEALNGlh5LH8n9XkeCDzXgFx3bghMXKms/EOlnR+21Un3SQVDAvuNK32VLexokTxy9nDZ769kTD5ymvP7DU5ObzdstnMeYY5SDAllPOPI2FboQbU1bg71P2LRvc3aF+Gu3X95pVoUSRPqAuJhnPp1DyXW0ifC/hIH/6wEv+10HRXtBoMrW3SJc7OIBmuM1jjqbT/WR/19rlugBm5x4mL1ZFY2PjoYKIhAIIJGzG4biSc/UIQ801NdKPaB42+ZcPwVPrVgRjuCL7khbzMFM+JzwgQA54kp6YSnE1cfGNIdpLVjIzyhJBlpChn6ZDya+L2mnB37J8yOO02+BQJ+ZxoL/A10VLYE4RAvurMWC/YPjPK+Bszl9eEdE2iQyzddWOlCkYfrdOC7zcjdpkcoDNXGfCddKXC77uI/L0kFYxzAEANEdEWclrwP5+f5AnZyr8hVp6XyR3Zg7S4t8iSAXrQIP1tI3h50qNj1OAluQCqM43HXSz199LzAtruJQpv094V0/oey7IuRrXq/fiTrkmFNyB/tWqeNp9vZO19R+xSI4g8="

Pro Tip: You can add it automatically by running with --add.
保存這個secure值,在連接travispush生成的代碼到gh-pages分支時會使用這個secure,我們需要配置到.travis.yml文件裡面
.travis.yml文件
将刚才生成的secure放入.travis.yml文件中, 完整文件:
1
2
3
4
5
6
7
8
9
10
11
12
language: ruby
rvm:
- 2.7.0
branches:
  only:
  - master
install:
- bundle install
script: bundle exec rake deploy --quiet
env:
  global:
    secure:"${secure}"
编译和psuh的整个过程都通过script: bundle exec rake deploy --quiet交由rake完成
rake实现编译和push
Rakefile
在根目录下新建一个Rakefile
1
2
3
4
5
6
7
8
9
10
11
12
13
14
15
16
17
18
19
20
21
22
23
24
25
26
27
28
29
30
31
32
33
34
35
36
37
38
39
40
41
42
43
44
45
46
47
48
49
50
51
52
53
54
55
56
57
58
59
60
61
62
63
64
65
66
67
68
69
#############################################################################
#
# Modified version of jekyllrb Rakefile
# https://github.com/jekyll/jekyll/blob/master/Rakefile
#
#############################################################################

require 'rake'
require 'date'
require 'yaml'

CONFIG = YAML.load(File.read('_config.yml'))
USERNAME = CONFIG["username"] || ENV['GIT_NAME']
REPO = CONFIG["repo"] || "#{USERNAME}.github.io"

# Determine source and destination branch
# User or organization: source -> master
# Project: master -> gh-pages
# Name of source branch for user/organization defaults to "source"
if REPO == "#{USERNAME}.github.io"
  SOURCE_BRANCH = CONFIG['branch'] || "source"
  DESTINATION_BRANCH = "master"
else
  SOURCE_BRANCH = "master"
  DESTINATION_BRANCH = "gh-pages"
end

def check_destination
  unless Dir.exist? CONFIG["destination"]
    sh "git clone https://#{ENV['GIT_NAME']}:#{ENV['GH_TOKEN']}@github.com/#{USERNAME}/#{REPO}.git #{CONFIG["destination"]}"
  end
end

task :deploy do
    # Detect pull request
    if ENV['TRAVIS_PULL_REQUEST'].to_s.to_i > 0
      puts 'Pull request detected. Not proceeding with deploy.'
      exit
    end

    # Configure git if this is run in Travis CI
    if ENV["TRAVIS"]
      sh "git config --global user.name '#{ENV['GIT_NAME']}'"
      sh "git config --global user.email '#{ENV['GIT_EMAIL']}'"
      sh "git config --global push.default simple"
    end

    # Make sure destination folder exists as git repo
    check_destination

    sh "git checkout #{SOURCE_BRANCH}"
    # Generate the site
    #sh "bundle exec jekyll build"

    puts CONFIG["destination"]

    Dir.chdir(CONFIG["destination"]) { sh "git checkout #{DESTINATION_BRANCH}" }

    sh "bundle exec jekyll build"

    # Commit and push to github
    sha = `git log`.match(/[a-z0-9]{40}/)[0]
    Dir.chdir(CONFIG["destination"]) do
      sh "git add --all ."
      sh "git commit -m 'Updating to #{USERNAME}/#{REPO}@#{sha}.'"
      sh "git push --quiet origin #{DESTINATION_BRANCH}"
      puts "Pushed updated branch #{DESTINATION_BRANCH} to GitHub Pages"
    end
end
Gemfile
添加rake到Gemfile中,这样子bundle install就会自动安装rake以及依赖.没有Gemfile则新建一个
1
2
gem "rake"
gem "github-pages", ">= 204"
修改_config.yml
最后需要把Rakefile,Gemfile以及.travisi.yml等添加添加到配置文件的exclude.配置文件等不作为编译的内容
1
2
3
4
5
6
7
8
9
10
11
12
exclude:
  - README.md
  - Rakefile
  - Gemfile
  - Gemfile.lock
  - changelog.md
  - "*.Rmd"
  - vendor
  - .travis.yml
  - LICENSE.txt

destination: ./build_site/
新建一个repo变量,变量值为你的源码仓库的名字,在rake中push代码时会读取
1
repo: ${your-blog}
现在,在本地push代码到github以后,travis就会自动部署到你的github pages,你的github pages地址为
1
2
https://${user}.github.io/${your-blog}
完整源码
服务器
如果使用服务器部署,源码的模板如下
travis : https://github.com/yan-wyb/source/tree/master/web/blog/jekyll/travis-to-server
nginx : https://github.com/yan-wyb/source/blob/master/web/nginx/nginx.conf
github Pages
如果部署在github pages,模板如下
travis : https://github.com/yan-wyb/source/tree/master/web/blog/jekyll/travis-to-github-pages
note
-
gitlab操作与github相同 -
部署到github-pages的话,部署分支名字只能为
gh-pages -
凡是
${ }的都要替换
issues
如果有疑惑或错误,请提issues –> Issues